It’s 5:00AM and my obnoxious alarm shatters the silence, bringing an abrupt end to my slumber and jarring me out of bed. As my synapses reluctantly begin to fire, I notice the pitter-patter of raindrops as they dance upon the top of my camper.
A grin starts to draw across my face, but not because I think I’m going back to bed. See, I’m out for waterfalls and conditions are about as ideal as they can get.
Let’s face it – if you’re a landscape photographer, waterfalls tend to be on the menu. After all, they can be found in just about any region, with even the driest places occasionally receiving a transitory flow now and then. However, getting a wall hanger isn’t as simple as it seems.
The biggest challenge with waterfalls is that, when you’re standing face to face with them, they seem deceptively easy to photograph. It’s only upon returning home and facing some disappointing files on your computer do you realize maybe transforming that liquid beauty into a unique photo was tougher than you thought.
The truth is capturing a stunner takes an intelligent mix of planning, effort, and persistence. Let’s examine eight essential tips for capturing better waterfall photos.
#1. Go For Great Conditions
The only path to incredible waterfall photos is to shoot when the conditions are right. Sounds relatively simple, but so many people miss the photographic boat on this one.
First, consider water flow. Good water flow is absolutely critical to putting a winning shot on your memory card. Anemic amounts of water will always equal a disappointing photo, and a gushing overflow will destroy the elegance of the chute. Do the Goldilocks thing and hit the falls when the water flow looks “just right”.
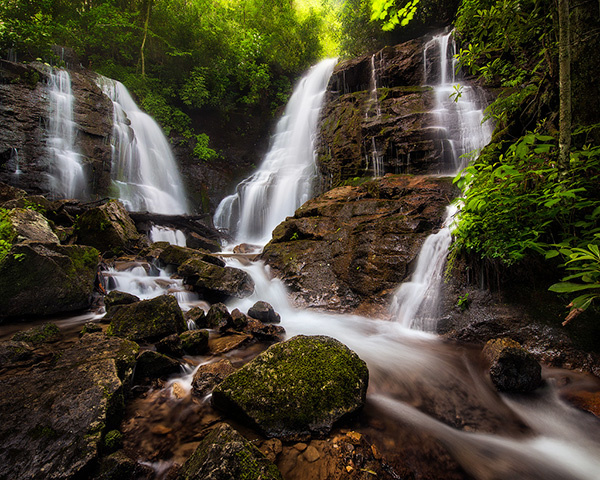
Of course, half of what makes a great waterfall photo is the setting around the falls. Aways shoot when the supporting cast of trees, rocks, and vegetation are at their best.
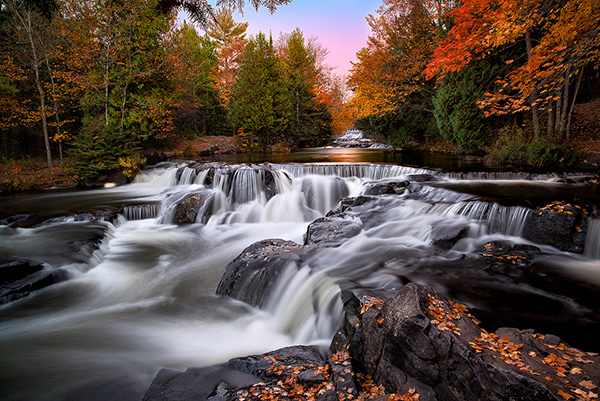
Set your sights on the lush greens of spring and summer, the bright colors of autumn, and even the stick-to-the-branches snow of early winter. Skip the leafless trees and wilted vegetation shots.
#2. Leverage Time And Weather
There’s no one happier than I am to see a forecast calling for rain, drizzle, or clouds when I have waterfalls on the brain. Am I crazy? Could be, but experience has taught me to love bad weather for waterfalls!
While a sunny day might be a boon for a vacationing family, it’s a disaster for waterfalls. Dappled light with blown out highlights and deep featureless shadows always create problems for waterfall images.
If you’re facing a forecast promising a sunny day, outsmart the weatherman by going for an early morning shoot. Not only are the crowds still tucked away in bed, you’re blessed with soft, even light and maybe even a little mist.
A nice overcast day is another welcome situation for the photographer hunting waterfalls. Soft, even light all day long is a photographic slam-dunk that’s sure to fill your card with amazing images.
The final and most exciting set of circumstances for an ambitious waterfall shooter has to be a wet, drizzly day. If you’re fortunate enough to have those conditions, it’s time to put your game face on. Wet rocks and vegetation generate lush, vibrant colors that will catapult your waterfall photos from fair to fantastic in a hurry.
#3. Grab The Right Gear
The great thing about waterfalls is they really don’t require any special gear. However, there are a couple essential items every good “waterfaller” likes to have in the bag.
The first and most essential piece of gear (besides the camera) is a good tripod. The best waterfall photos are generally shot deep in the woods in low, soft light at smallish apertures. With shutter speeds hovering near that one-second mark, a good solid tripod becomes the most valuable asset you carry.
The next critical item is a polarizer. Although most photographers think of a polarizer as a way to add a little extra blue to their skies, they are the “secret sauce” that will make your waterfall images extra special. (I like Nikon, B+W, & Hoya)
A polarizer removes reflections from rocks, leaves, and water. When you knock out that reflection, you let the real colors show through and capture a richness that just can’t be duplicated any other way. This is particularly true when everything is wet. See this video for more about polarizers.
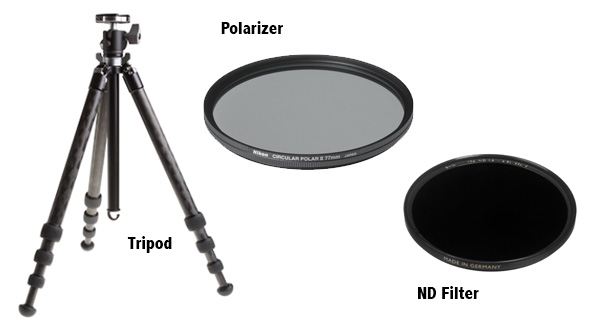
Speaking of filters, sometimes a neutral density filter can come in handy if you’re faced with a bright scene and want to show more motion in the water. Most of the time they aren’t needed if it’s early, cloudy, or you’re in thick woods – but it’s nice to have one in the bag just in case. I’ve never needed more than a 3 stop filter myself.
Additionally, I highly recommend some sort of protection to keep your gear dry. Even on a clear day, mist from a waterfall can quickly soak your camera just as effectively as a thunderstorm. You can grab a fancy camera rain jacket or a simple plastic bag, as long as you keep your gear dry and ready to shoot another day.
On that note, also remember to take along extra microfiber cloths or lens tissue. A wet front element can ruin your day if you don’t have a quick, safe way to clean off the drops, and all it takes is a little wind blowing the mist your way to make it happen. I always have a microfiber cloth in my pocket as I shoot waterfalls.
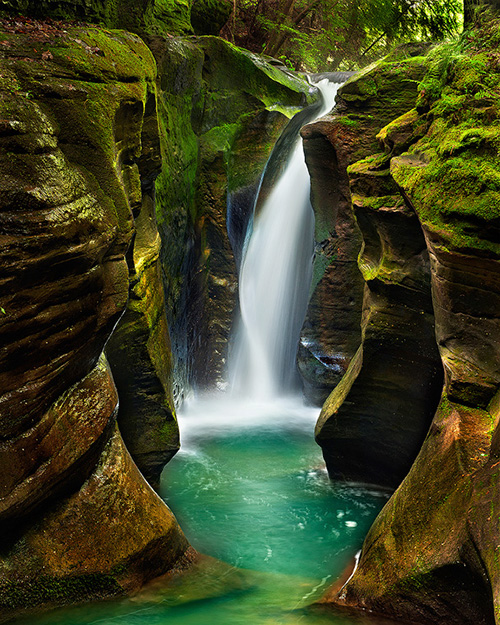
#4. Go For A “Flowing” Composition
One of the biggest pitfalls in waterfall photography is getting so taken with the waterfall that you ignore the rest of the area. While the waterfall is the main attraction, it’s often the context of the waterfall in relation to its surroundings that really makes the photograph special.
The easiest way to avoid the “waterfall only” syndrome is to include some sort of foreground and middle ground elements. Personally, I like to look for large rocks or smaller “mini falls” coming off the main water flow. Ideally, you want the eye to naturally travel from the foreground back up towards the falls.
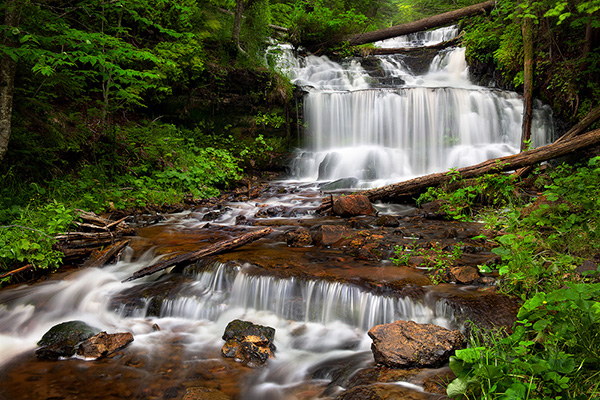
Also, don’t be afraid to really examine the scene and the compositional possibilities. For me, it’s not uncommon to spend 30 minutes to an hour just looking for good (or new) compositions before I take the first shot.
#5. Get Ready To Get Wet
It’s a fact – for a large percentage of waterfalls, the very best location to plant your tripod tends to be in a couple feet of water.
How you get out there doesn’t matter – waders, water shoes, or barefoot – just make sure a fear of getting your nice new boots wet isn’t costing you the best composition. Go in with the idea of getting wet and grab the right gear for the job. (Side note – the Columbia Drain Maker II is my favorite water shoe, and I’ve sampled more than a few other brands.) For the image below, I had to get WAY out into the water.
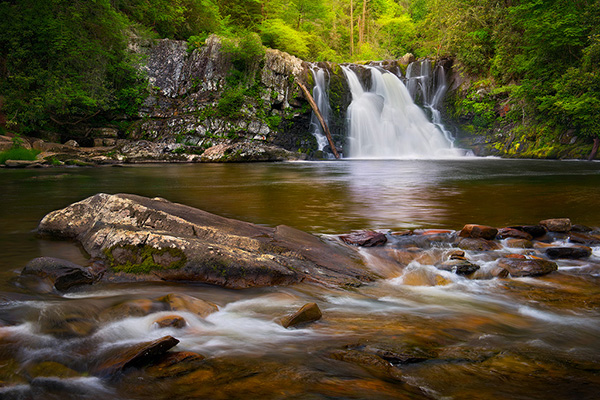
Oh, and be careful out there. I’m convinced there’s a guy who goes out every night and coats all the river bottoms with axle grease. I’m always amazed at just how slick those rocks are, a thought that enters my mind every time I’m in the process of taking a fall in an icy creek! Take your time and use extreme caution.
#6. Camera Settings
Camera settings are pretty straightforward for waterfalls. A good starting point would be Aperture Priority in the F8 – F11 range at ISO 100 or 200.
From there, use exposure compensation to dial in the perfect amount of light for your image, watching your histogram for clipped highlights and shadows. Hint – The dark areas around most waterfalls tend to fool the meter into overexposing, so don’t be surprised if you have to dial in a little underexposure most of the time.
Finally, keep in mind that shutter speed plays a critical role in getting just the right “look” to your water. Although there’s not a one-size-fits-all shutter speed to create that silky smooth look, generally I like to start in the 1/8th to 1-second range.
Experimentation really is key here. After you take the shot, look at the water and see if you like the effect. From there, decide if you need to adjust your aperture, ISO, or even add a neutral density filter. The longer the exposure, the silkier the water will look (caution – it’s easy to overdo it and lose detail). Personally, I like to have the water to show motion but still maintain some detail. Anymore, I usually start at 1/4th second and more often than not, that’s where I stay. However, that shutter speed can vary depending on water flow.
#7. Take Lots Of Shots
Note – the first two examples require Photoshop to assemble – I’ve included a video below with those techniques.
When it comes to waterfalls, there are a lot of dynamics involved and it can sometimes pay BIG photographic dividends to knock off a large number of photos of the same composition.
Why? Let’s take a look at a few examples:
1. Wind – In the last section, I mentioned that I really like 1/8 to 1 second for most of my water shots. Although low ISOs are the general rule, there are times when you might consider increasing your ISO to something much higher to gain more shutter speed.
Why?
Leaves.
Even on a calm day, waterfalls tend to create their own wind. In some cases, you can simply figure out what’s moving and simply watch and wait a minute or two until you get a break in the breeze. When things are still, fire away.
However, there are times you’ll run into a situation where no amount of waiting is going to work. In those cases, you might need to increase your ISO and shutter speed to arrest the movement in the leaves. In the image below, I was forced to use multiple ISOs in order to generate the final image without too much movement in the leaves.
Of course, the second you increase shutter speed, you lose the nice silky water.
My solution is to shoot at multiple ISOs – some shots for wind and some for silky water – and blend the shots together in Photoshop with layers and masks (as shown in the video below).
2. Exposure – Another problem waterfall photographers quickly discover is that in order to achieve proper exposure for the area around the waterfall, you’re sometimes forced to use an exposure that blows out some of the highlights in the falls itself – or at least causes you end up with milky white and no detail. Of course, if you dial down your exposure, you get good water detail but really dark, blocked up shadows. (Note – a polarizer can actually help here since it removes hard reflections.)
How to cope?
Simple – bracket your exposures and do an easy blend in Photoshop as shown in the video below. Just make sure you take a good selection of images in order to get a range of exposures that gives you proper exposure for both your shadow and highlight areas.
Both of these techniques are shown in the video below:
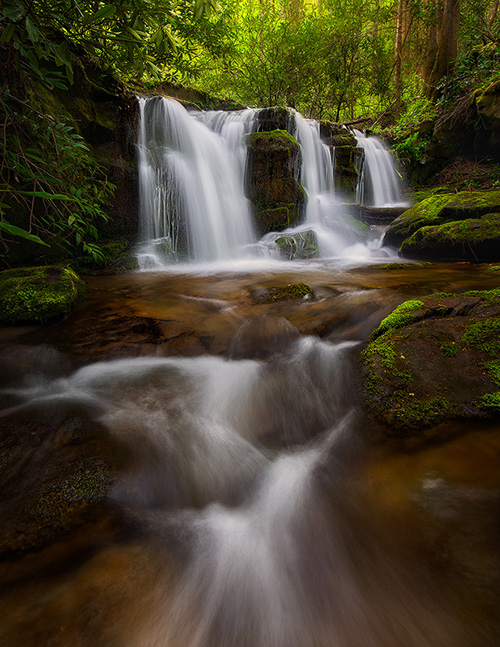
3. Water Patterns – This is one that’s often overlooked even by experienced waterfall photographers. Most people set up their composition, maybe bracket a set of shots, and move on.
Don’t be that person!
Before you pick up your gear and move to a new location, check and see if you’re getting different patterns and “looks” to the water flow. In many cases, each and every shot captures a different flow pattern. Although this sounds like it should be categorized under “no big deal,” some of these flow patterns can produce a tremendous difference in your images. So, pick a few exposure combinations that seem to be accurate (at least for the water) and take a dozen shots – you’ll likely discover each and every one is different to some degree. Below is an unprocessed image to give you an idea. ALL were taken at the same shutter speed:
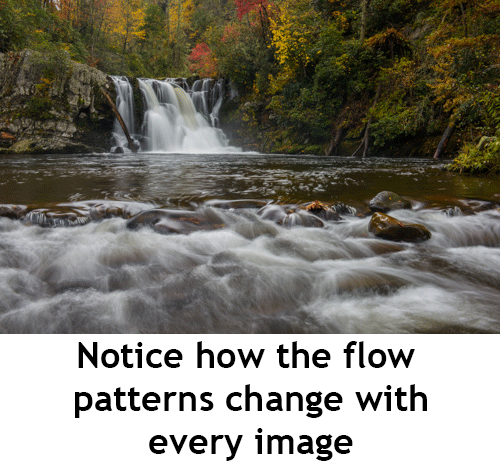
When you get back home to your computer, pick the one you like the best. I can’t tell you how many times I’ve used this technique and ended up with a MUCH better image than I otherwise would have. You can even blend these patterns together in Photoshop to create an optimal look (or simply a flow pattern that you didn’t capture).
In addition, consider varying your ISO and trying different shutter speed combinations with the idea above. Granted, it can produce a lot of images, but the extra time and memory are worth it when you capture that perfect flow pattern.
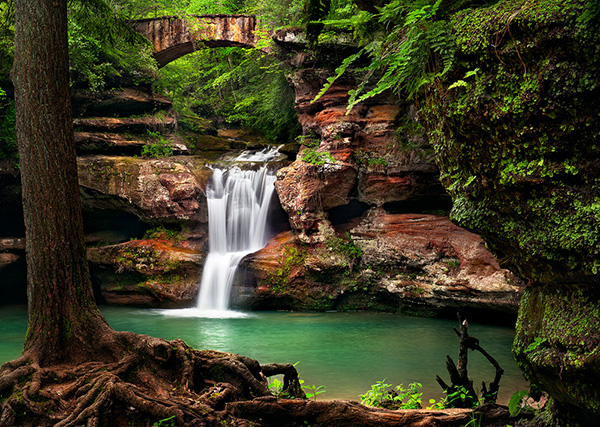
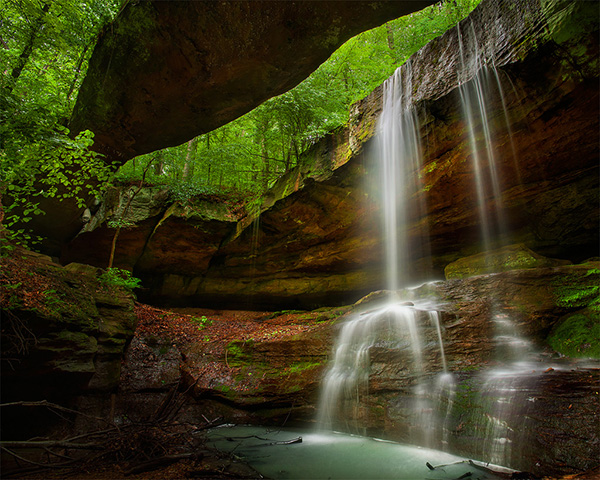
#8. Didn’t Get The Shot? Keep Coming Back!
It happens – despite all the planning and preparation, we head out to a location and just don’t get the shot we had in mind. When this happens, I encourage you to keep trying.
The image above took me a couple years to finally capture. Sometimes there wasn’t enough water, sometimes not enough color, sometimes I was late, and sometimes I was early. In the end, stubborn persistence won the day.
Never give up and enjoy! Comments are always appreciated. 🙂
PS…
If you enjoyed this article, I think you’ll REALLY like my e-books, Secrets To Stunning Wildlife Photography and Secrets To The Nikon Autofocus System. They’re filled with hundreds of pages of information just like this. Check it out – click here (hey, it’s free to look 🙂 )
")

")


Thank you for your effort! Great synopsis
most beautiful photos I have ever seen. I am new in photography and not a good learner to be honest but Your way how to pass great tricks and techniques to people are great.i hope one day I will take photos to be close as yours . thanks for sharing .
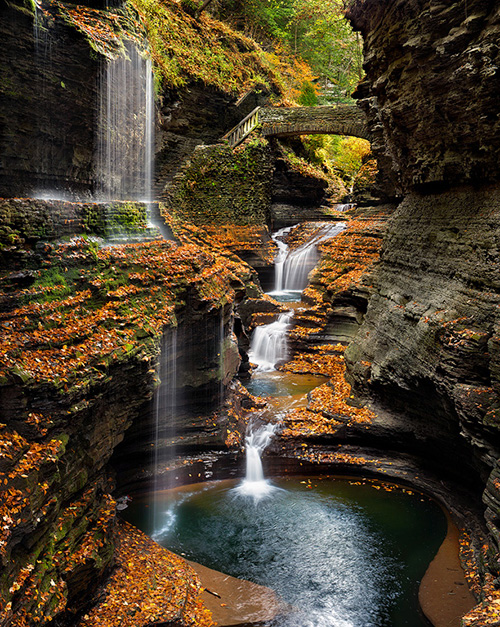
Love the picture of Rainbow Falls at Watkins Glen! Can interested parties buy prints of this shot?
More beautiful information, thank you Steve!!
Awesome article. Thanks for the tips.
I’m a slow learner, but your photos are great. I was in North Carolina in the Pisgah National Forest this weekend. Your tips are really making a big difference in my photos. Especially the Focus book.
Hey Steve. Thanks for the histogram video. I use histograms almost always and have a good sense on that, but it it really helpful to know that the histogram is built on a .jpg image and is influenced by the settings on the playback image. Great Stuff!
Having attended a workshop in May, 2017 of the Columbia Gorge I can really relate to the points that you described for shooting waterfalls. While I was very pleased with most of my shooting during this workshop I wish that I read your comments before I attended the workshop. Fortunately, the weather cooperated since it was overcast two of the three days and even the day that was sunny we concluded our first shoot by 8:30am. Recording slow water was not an issue since I insured that I shot no faster than 1/2 second and at F8 to 11 most… Read more »
Your article was very timely. I was in Roanoke VA and found some time to visit Cascades
https://www.virginia.org/listings/…/CascadesNationalRecreationTrail/
after a few days of heavy rain. There was a lot of water flowing!
So, when I was at the base of the fall, there was so much spray that I could only get one exposure between having to wipe my lens, even after trying to cover it between exposures. Any suggestions for this problem? I moved uphill and the spray wasn’t as bad, but the perspective wasn’t as good.
Thanks for the great ebooks and postings!
Your article was very timely. I was in Roanoke VA and found some time to visit Cascades
https://www.virginia.org/listings/…/CascadesNationalRecreationTrail/
after a few days of heavy rain. There was a lot of water flowing!
Thanks for another useful post. I have a quick question about filters. Do you ever find yourself in a situation where you want to use both the polarizer and the ND filter? If so, which filter goes on the lens first? I’m guessing the polarizer goes on first, otherwise it would be hard to see the polarizing effect (or lack thereof) through the ND filter as you turned the polarizer to knock out the glare?
Great article — thank you. Well organized, did not get overly bogged down in technical details, but you hit all the important information. Most appreciated is that you let us know that we pretty much need to get IN the water — and thank you for the caution to be careful. I will be looking into the shoes (and the NEOS as well). I’ve watched the video on polarizers before, but was glad I watched it again. There is a lot of good information there. And the PS video was just right. I have been dragging my heels to make… Read more »
Thanks!
The reason for the ISO increase is so I can maintain the same F/stop and raise the shutter speed. Otherwise, I’d have to underexpose or open up the F/Stop.
I often have to traverse streams or get into the water for a shot as per your comments in the article. On a trip to Alaska I was introduced to the NEOS River Trekker overshoe hippers. They fit over ones hiking boots and provide a Vibram sole with excellent traction for wet rocks and mud while wading and are great when the water is very cold, as with glacier melt or spring runoff from melting snow. HDR by the way can be done with RAW files using Photomatrix though they recommend to first convert them to 16-bit TIFF files. No… Read more »
+1 for the NEOS. I have them and they do work well, although sometimes they are a little short LOL!
Also, the Jpegs in the video were small conversions from the Lightroom RAWs for expedience sake – I wanted things to move along and not lag as I did the demo. Normally, I do use RAWs, but I do like to do it myself as shown 🙂 I’ve never really liked the results from HDR software, although to be fair, I haven’t used it in a couple years.
Hi Steve, Great article on waterfalls but what jumped out at me was “my camper”. I would really like to hear more about how you incorporate a camper into your outdoor photography trips. I am toying with the idea of getting one so I can stay near sites I want to photograph, or even catch a nap during the middle of the day. Are you using a tow trailer, mobile home, class C, truck camper, or camper van? I doubt mobile home due to the size of the vehicles. I seem to be narrowing my decision down to either a… Read more »
At teh time the article was written I was using 9and had been using) a nice 18 foot Surveyor 189. Fully self contained, about 3500 lbs dry. However, since that time I’ve used the camper less and less. Right now, I’m doing a combination of hotels and tent / hammock camping – whatever gets me close. The other factor I have now is that I’m doing so much more online (e-books etc) and need reliable wifi – so often camping for an extended period is out. I need to check my e-mail and take care of any issues on at… Read more »
Your photography skills are amazing; I’m very new at this but appreciate your beautiful photos and explanations. Thank you!
Thanks! Super helpful article and video.
I love your website and recently bought both of your books as I prepare for a three week safari to Africa. I really enjoy shooting waterfalls and while I have some great shots it is mostly through blind luck more than skill. Learned so much in reading this article. Thank you very much for sharing this fantastic information.
Kevin
HDR is for making jpeg file, not RAW files. I am afraid there is no easy solution to get around capturing all details (particularly in the shadow) in landscape photos. Working with layers and blending in post-processing is a good way to overcome the challenges.
I’ve been following your website for years and your tips have been tremendously helpful. A quick question, do you ever use HDR? I know moving leaves and trees can screw them up quickly, but on a still day it might work. I used to use Photoshop for industrial photos, but I’m pouting ever since they went to a subscription type service, so I don’t use it much any more.
Thanks and keep up the great work.